언어 공부/springboot로 백엔드 개발
Springboot에서 swagger 사용하기
카페인곰
2025. 5. 3. 16:22
1. build.gradle에 의존성을 추가합니다
// Swagger/OpenAPI 의존성
implementation 'org.springdoc:springdoc-openapi-starter-webmvc-ui:2.3.0'
이후 gradel reload 해주세요
2. config 패키지를 만들고 아래와 같이 구성 클래스를 추가합니다.
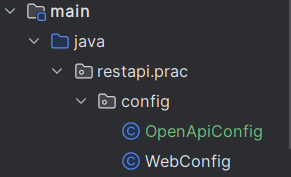
config 폴더에
OpenApiConfig 클래스 추가
package restapi.prac.config;

import io.swagger.v3.oas.models.Components;
import io.swagger.v3.oas.models.OpenAPI;
import io.swagger.v3.oas.models.info.Info;
import org.springframework.context.annotation.Bean;
import org.springframework.context.annotation.Configuration;

@Configuration
public class OpenApiConfig {

    @Bean
    public OpenAPI openAPI() {
        Info info = new Info()
                .title("Spring Boot 게시판 API")
                .version("v1.0")
                .description("Spring Boot를 이용한 게시판 API 명세서");

        return new OpenAPI()
                .components(new Components())
                .info(info);
    }
}
3. 모델, 컨트롤러에 어노테이션을 추가합니다.
● 원본 Post model 코드
package restapi.prac.model;

import jakarta.persistence.*;

@Entity
public class Post {
    @Id
    @GeneratedValue(strategy = GenerationType.IDENTITY)
    private Long id;

    @Column(nullable = false)
    private String title;

    @Column(nullable = false, length = 5000)
    private String content;

    // 기본 생성자
    public Post() {}

    // 생성자
    public Post(String title, String content) {
        this.title = title;
        this.content = content;
    }

    // getter, setter
    public Long getId() {
        return id;
    }

    public void setId(Long id) {
        this.id = id;
    }

    public String getTitle() {
        return title;
    }

    public void setTitle(String title) {
        this.title = title;
    }

    public String getContent() {
        return content;
    }

    public void setContent(String content) {
        this.content = content;
    }
}
● swagger 문서화 적용 코드
package restapi.prac.model;

import io.swagger.v3.oas.annotations.media.Schema;
import jakarta.persistence.*;

@Entity
@Schema(description = "게시글 정보")
public class Post {
    @Id
    @GeneratedValue(strategy = GenerationType.IDENTITY)
    @Schema(description = "게시글 고유 ID", example = "1")
    private Long id;

    @Column(nullable = false)
    @Schema(description = "게시글 제목", example = "안녕하세요")
    private String title;

    @Column(nullable = false, length = 5000)
    @Schema(description = "게시글 내용", example = "Spring Boot 학습중입니다.")
    private String content;

    // 기본 생성자
    public Post() {}

    // 생성자
    public Post(String title, String content) {
        this.title = title;
        this.content = content;
    }

    // getter, setter
    public Long getId() {
        return id;
    }

    public void setId(Long id) {
        this.id = id;
    }

    public String getTitle() {
        return title;
    }

    public void setTitle(String title) {
        this.title = title;
    }

    public String getContent() {
        return content;
    }

    public void setContent(String content) {
        this.content = content;
    }
}
- @Schema 어노테이션은 Swagger UI에서 모델의 스키마를 문서화합니다.
- description 속성은 해당 필드에 대한 설명을 추가합니다.
- example 속성은 해당 필드의 예시 값을 보여줍니다.
- 이를 통해 API 사용자가 각 필드의 의미와 사용 방법을 쉽게 이해할 수 있습니다.
@Schema(description = "게시글 정보")
형태가 클래스와 각 필드 위에 추가됨
● 원본 PostController 코드
package restapi.prac.controller;

import org.springframework.beans.factory.annotation.Autowired;
import org.springframework.data.domain.Page;
import org.springframework.data.domain.PageRequest;
import org.springframework.data.domain.Pageable;
import org.springframework.http.ResponseEntity;
import org.springframework.web.bind.annotation.*;
import restapi.prac.model.Post;
import restapi.prac.service.PostService;

import java.util.Optional;

@RestController
@RequestMapping("/api/posts")
public class PostController {

    @Autowired
    private PostService postService;

    // 게시글 목록 조회 (페이지네이션 적용: 기본 페이지 번호=0, 페이지 사이즈=10)
    @GetMapping
    public ResponseEntity<Page<Post>> listPosts(@RequestParam(defaultValue = "0") int page,
                                                @RequestParam(defaultValue = "10") int size) {
        Pageable pageable = PageRequest.of(page, size);
        Page<Post> posts = postService.getPosts(pageable);
        return ResponseEntity.ok(posts);
    }

    // 게시글 단건 조회
    @GetMapping("/{id}")
    public ResponseEntity<Post> getPost(@PathVariable Long id) {
        Optional<Post> postOpt = postService.getPost(id);
        return postOpt.map(ResponseEntity::ok)
                .orElseGet(() -> ResponseEntity.notFound().build());
    }

    // 게시글 생성
    @PostMapping
    public ResponseEntity<Post> createPost(@RequestBody Post post) {
        Post createdPost = postService.createPost(post);
        return ResponseEntity.ok(createdPost);
    }

    // 게시글 수정
    @PutMapping("/{id}")
    public ResponseEntity<Post> updatePost(@PathVariable Long id, @RequestBody Post updatedPost) {
        Optional<Post> updated = postService.updatePost(id, updatedPost);
        return updated.map(ResponseEntity::ok)
                .orElseGet(() -> ResponseEntity.notFound().build());
    }

    // 게시글 삭제
    @DeleteMapping("/{id}")
    public ResponseEntity<Void> deletePost(@PathVariable Long id) {
        boolean deleted = postService.deletePost(id);
        if (deleted) {
            return ResponseEntity.ok().build();
        } else {
            return ResponseEntity.notFound().build();
        }
    }
}
● swagger 적용 PostController 코드
package restapi.prac.controller;
import io.swagger.v3.oas.annotations.Operation;
import io.swagger.v3.oas.annotations.Parameter;
import io.swagger.v3.oas.annotations.tags.Tag;
import org.springframework.beans.factory.annotation.Autowired;
import org.springframework.data.domain.Page;
import org.springframework.data.domain.PageRequest;
import org.springframework.data.domain.Pageable;
import org.springframework.http.ResponseEntity;
import org.springframework.web.bind.annotation.*;
import restapi.prac.model.Post;
import restapi.prac.service.PostService;
import java.util.Optional;
@RestController
@RequestMapping("/api/posts")
@Tag(name = "게시글 API", description = "게시글 CRUD API")
public class PostController {
@Autowired
private PostService postService;
@Operation(summary = "게시글 목록 조회", description = "페이지네이션을 적용하여 게시글 목록을 조회합니다.")
@GetMapping
public ResponseEntity<Page<Post>> listPosts(
@Parameter(description = "페이지 번호 (0부터 시작)") @RequestParam(defaultValue = "0") int page,
@Parameter(description = "페이지 크기") @RequestParam(defaultValue = "10") int size) {
Pageable pageable = PageRequest.of(page, size);
Page<Post> posts = postService.getPosts(pageable);
return ResponseEntity.ok(posts);
}
@Operation(summary = "게시글 조회", description = "ID로 특정 게시글을 조회합니다.")
@GetMapping("/{id}")
public ResponseEntity<Post> getPost(
@Parameter(description = "게시글 ID") @PathVariable Long id) {
Optional<Post> postOpt = postService.getPost(id);
return postOpt.map(ResponseEntity::ok)
.orElseGet(() -> ResponseEntity.notFound().build());
}
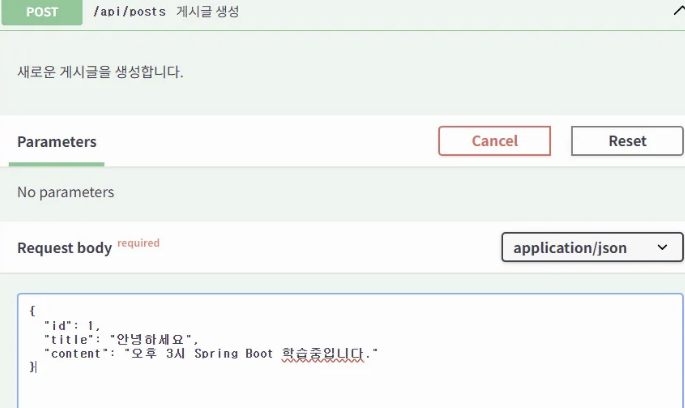
@Operation(summary = "게시글 생성", description = "새로운 게시글을 생성합니다.")
@PostMapping
public ResponseEntity<Post> createPost(
@Parameter(description = "게시글 정보") @RequestBody Post post) {
Post createdPost = postService.createPost(post);
return ResponseEntity.ok(createdPost);
}
@Operation(summary = "게시글 수정", description = "기존 게시글을 수정합니다.")
@PutMapping("/{id}")
public ResponseEntity<Post> updatePost(
@Parameter(description = "게시글 ID") @PathVariable Long id,
@Parameter(description = "수정할 게시글 정보") @RequestBody Post updatedPost) {
Optional<Post> updated = postService.updatePost(id, updatedPost);
return updated.map(ResponseEntity::ok)
.orElseGet(() -> ResponseEntity.notFound().build());
}
@Operation(summary = "게시글 삭제", description = "게시글을 삭제합니다.")
@DeleteMapping("/{id}")
public ResponseEntity<Void> deletePost(
@Parameter(description = "게시글 ID") @PathVariable Long id) {
boolean deleted = postService.deletePost(id);
if (deleted) {
return ResponseEntity.ok().build();
} else {
return ResponseEntity.notFound().build();
}
}
}
- @Tag: 컨트롤러를 Swagger UI에서 하나의 그룹으로 분류합니다.
- @Operation: 각 API 엔드포인트의 목적과 기능을 설명합니다.
- @Parameter: API 요청 파라미터의 의미와 용도를 문서화합니다.
- 이러한 어노테이션을 통해 API의 사용 방법과 목적이 명확하게 문서화됩니다.
각 클래스와 메서드 위에 추가
// 클래스 위에 추가
@Tag(name = "게시글 API", description = "게시글 CRUD API")

// 각 메서드 위에 추가
@Operation(summary = "게시글 목록 조회", description = "페이지네이션을 적용하여 게시글 목록을 조회합니다.")
// listPosts 메서드 위에

@Parameter(description = "페이지 번호 (0부터 시작)")
// @RequestParam(defaultValue = "0") int page 파라미터 앞에

@Parameter(description = "페이지 크기")
// @RequestParam(defaultValue = "10") int size 파라미터 앞에
테스트
http://localhost:8080/swagger-ui.html
로 접속합니다.
200으로 성공 확인

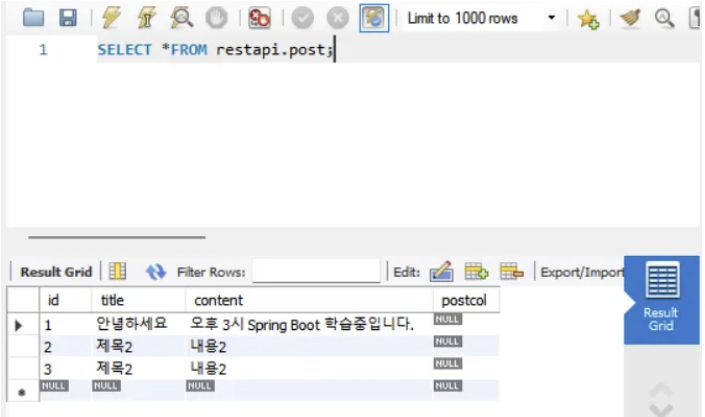
실제 mysql workbench에 들어간 것을 확인